Tuesday, 23 November 2021

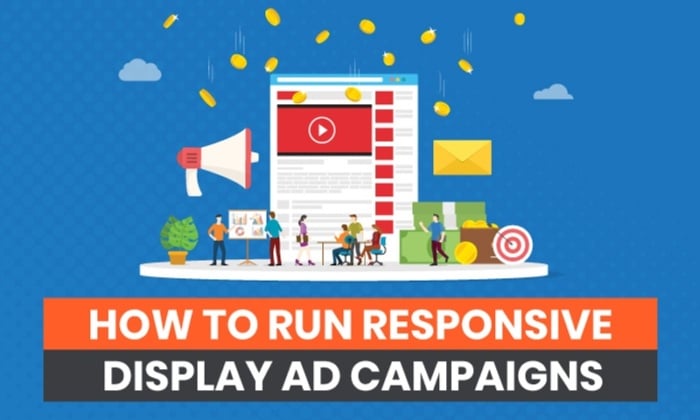
How to Run Responsive Display Ad Campaigns

How to Run Responsive Display Ad Campaigns


Getting your products or services in front of the right audience is becoming increasingly more challenging. This is because most businesses are going digital, increasing their reach online, and leveraging paid ads.

To help you stand out from the crowd, you should consider running responsive display ads.

What Are Responsive Display Ads?

Don’t let the name confuse you. Google Responsive Display Ads are your typical Google Display Ads with a twist. The twist is they can automatically adjust their size, appearance, and format to fit the available ad space on the Google Display Network (GDN). You can also incorporate visual elements into your display ads.
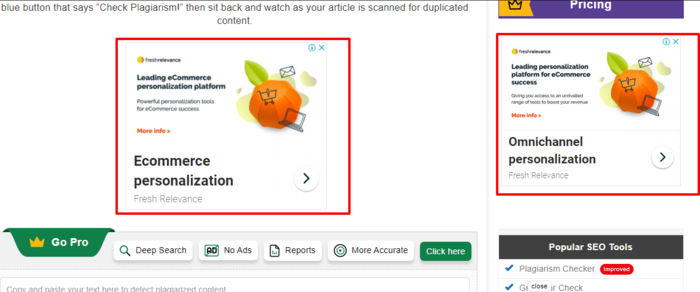
responsive display ad set up

The best part about responsive display ads is that they can be created automatically (by Google’s AI and machine learning engine) using your assets. These are the same assets you can upload to use for both standard and smart display ad campaigns. To get your responsive display ads, all you have to do is upload up to:

  • 15 images
  • 5 headlines
  • 5 descriptions
  • 5 logos

The GDN platform will then combine these assets into varied ad unit combinations for every available size. 

Why Should You Use Responsive Display Ads?

You might be wondering: what’s the difference? Is it worth the extra asset creation? 

Responsive display ads have several advantages compared to standard ads, including:

  • Being fast and easy to create: One of the biggest advantages of responsive display ads is you can quickly and easily create and launch campaigns with no heavy lifting or design strategy on your part. All you have to do is upload your assets, and Google automatically optimizes your ads for you.
  • Broad reach: Thanks to the multiple asset types uploaded and the responsive nature of the ads, you can reach a wider audience. One reason for this is your ads can fit on any available ad space and thus have more opportunities to be displayed. 
  • Versatility: With responsive display ads, your ads can take on many shapes and sizes. For example, your ad might show as a banner ad on one site and a dynamic text ad on another.
  • A high degree of personalization: Personalization is key to better conversion rates. With responsive ads, you can show personalized content to your customers from a feed you control and add it to your campaign. This also makes them compatible with dynamic remarketing.
  • Affordable: Since you can DIY your campaigns, responsive ads are more affordable, making them an excellent solution for smaller companies. If you’re not confident creating your own responsive display ad campaigns, you can always enlist the help of PPC specialists.
  • Easily deploy video in your ads: Video content has fast become the most preferred content format for users. Deploying videos in your responsive display ads is super easy.
  • Differentiation: Users revisiting a site may become victims to “banner blindness,” automatically skimming over the same-old, same-old ads. If you’ve got the power to keep your adverts fresh and exciting, why not use it? 

Responsive display ads are here to stay. That’s why Google has been encouraging businesses to adopt them quickly. It’s also why it’s essential how-to run responsive display ad campaigns. 

Top Tips for Successful Responsive Display Ad Campaigns

Now that you know the versatility of responsive display ads, you’re probably rearing to get started. Before you do, here are some top tips for making your ads successful. 

1. Choose (and Optimize) Your Images Carefully

Images play a huge role in running successful display ads. This is because they are an excellent way of grabbing attention. Another reason is that they are a great way to convey your message easily.

That’s exactly why you must select your images carefully and ensure they’re optimized. On the same note, try to upload about 3-5 images per ad campaign.

  • Image choice: When choosing images to use in your responsive display ads, choose ones that clearly show what you’re advertising.
  • Image optimization: Remember, your ads will scale up or down in size depending on the ad space they’re placed. That’s why you must optimize your images to show clearly in both large and small spaces.   

Pay close attention to your images and test them on different size displays before uploading them for use. Speaking of image size, Google allows advertisers to use two aspect ratios for image assets landscape (1:91:1) and square (1:1). At least one of your images must have an aspect ratio of 1.91:1. For the rest, you can use either of the two.

2. Be Careful With Your Logo

Your logo is your visual identity. You only have a few seconds to grab attention, so your logo must be clearly visible—which can be tricky. 

Logo uploads for responsive display ads are the same as image uploads—square and landscape. Since most logos are designed to be either landscape or square, scaling can be a nightmare. To ensure your logo always displays correctly:

  • Consider adjusting it to fit better in the space.
  • Cut part of your logo if possible to make it work better (e.g. any background “noise” around your design).
  • Use the icon portion only.
  • Get your designer to create a square/landscape version of your logo. 

Whatever you do, don’t fall for the trap of simply adding white space to change the aspect ratio of your logo. It may fit the image requirements, but when scaled down, it will be difficult to read. There are plenty of logo design tools that will help you play around with your logo until you find options that work. 

3. Create Different Variations of Your Responsive Ads Assets

When creating responsive ads, you have greater flexibility for impressing your audience. You can use different variations of copy and images and measure what works best. Your responsive ads manager allows you to change:

  • short headlines: 25 characters
  • long headlines: 90 characters
  • descriptions: 90 characters
  • business name: 25 characters
  • visuals like images and video
  • calls-to-action (CTA)

4. Text Combinations Can Be Quite Tricky—Create Them Wisely

One significant advantage of responsive display ads is that they offer more text fields for you to work with.

While this is great as it gives you more opportunities for creativity and to get your message across, there is a caveat—not all text will be shown together.

To craft effective response display ads, you should know which text combinations are shown together. Here are a few pointers to help you in this regard:

Headlines Are Never Shown Together

Because headlines can never be shown together, this makes it easy for you. You can create different versions without worrying about repeating yourself.

Descriptions Can Be Shown With Both Types of Headlines

Descriptions are to be treated as an extension of your headlines and are never displayed without a headline. This means descriptions can be shown with both short and long headlines. Because of this, make sure to craft your descriptions in a way that they don’t repeat the copy.

Headlines Can Sometimes Be Displayed Without Descriptions

Depending on the ad space available, Google Ads can sometimes display headlines without descriptions. This is why you must craft headlines that are compelling enough to elicit a click without the aid of a description to give more context. You should also design your long headlines in such a way that they include a call to action.

Long Headlines and Descriptions Can Get Truncated If They’re Too Long

Given that text fields are limited in terms of characters, your message can get truncated if you go beyond the prescribed limit. To ensure you get your message across, you should front-load important information.

Knowing which text field combinations are more likely to appear together makes it easier for you to optimize the text in your responsive display ad campaigns.

5. Your Landing Page Should Always Match Your Ad

For better conversions, ensure that your landing page matches your ad—from copy to CTA, visuals to colors, and also everything in-between. 

Remember the responsive display ad example above? 

Here’s the landing page you’re directed to when you click on the ad: 
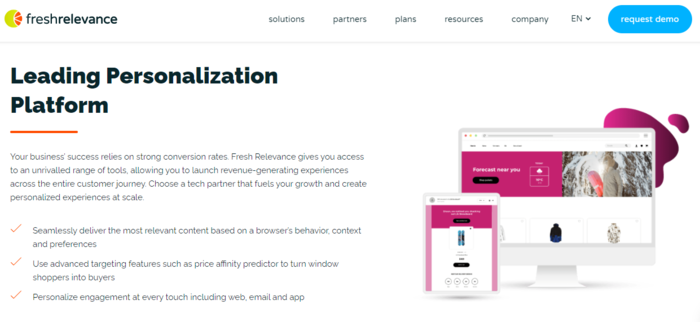
Top Tips for Successful Responsive Display Ad Campaigns - Your Landing Page Should Match Your Ad

It’s so similar to the ad design that you know you’re in the right place when you land on it.

Another critical ingredient to ensuring your landing page matches your ad is to use the same keywords in both your ad copy and landing page copy. Doing so will help your customers feel more confident in continuing to make the transaction when compared to finding a landing page that doesn’t have the same tone, language, or feel as your original ad.

While Google does an excellent job of optimizing your display ad assets and showing the best versions to individual customers, you too have a hand in the quality of your responsive display ads. Using the tips outlined above will help ensure you run effective display ads, giving you an excellent return on your ad spend (ROAS).

How to Set Up Responsive Display Ads

Now we get to the exciting part—setting up your responsive display ads. Fortunately, it’s not as difficult as it sounds. 
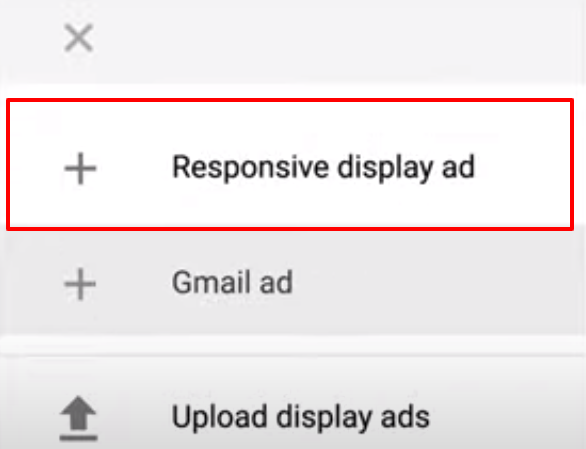
How to Set Up Responsive Display Ads

Here are the 11 simple steps you need to take to get your campaign up and running:

  1. Log in to your Google Ads account.
  2. On the navigation menu, click “All campaigns.”
  3. Choose the “Display campaigns” option and select a campaign you want to add responsive display ads.
  4. Click “Ads & extensions,” and then click on the “Ads” option.
  5. Click the “plus” (+) button.
  6. Select “Responsive display ad.”
  7. Choose the ad group you want to add your responsive display ads to.
  8. Upload and save your visual assets (such as images and video links).
  9. Fill in your ad details (headlines, descriptions, business name, and landing page URLs)
  10. Preview the best formats of your ads.
  11. Save and launch your ad.

Once you’ve saved and launched your ad, monitor its performance and update your assets regularly. Make sure to keep your top-performing assets and put them in competition with the new versions. 

Responsive Display Ads Frequently Asked Questions

Where are responsive display ads shown?

Responsive display ads are shown on the Google Display Network (GDN). GDN is a group of over 2 million websites, videos, and apps where Google Ads can be placed.

Are responsive ads better than text ads?

Responsive display ads are better than text ads as they are bigger, offer more flexibility, and can be scaled up or down to fit available ad space. 

How does Google Ads generate responsive ads?

To generate and display responsive ads, Google Ads relies on a powerful AI engine. This system optimizes your ads for you and ensures they are displayed properly on the Google Display Network.

Are responsive search ads worth it?

Responsive ads are definitely worth the resources and effort that goes into creating them, as they have far more advantages than text ads. Examples of such benefits include greater reach, better visual appeal, and more.

Responsive Display Ads Conclusion

As a digital marketer, small business, or even large enterprise, display ads should be integral to your marketing arsenal. That’s why you must know how to create and run them well.

While they’re generally easy to pull off, they need someone who understands the world of paid advertising to be successful. Of course, if you’re not comfortable going the DIY route, you can always enlist the help of a professional to help you create and run yours.

Have you ever run responsive display ads before?

What was your experience like?


from Blog – Neil Patel https://ift.tt/3l4CYbM
via IFTTT

How to Change Your Username on Social Media

How to Change Your Username on Social Media facebook youtube twitter tiktok

The username you use on social media sites can either help or hurt your brand. 

One way to make sure that it helps your efforts is by making sure that the username conveys what you want it to convey. 

If people are searching for content related to your brand, they should be able to find you with ease. 

If you can’t be found, you risk losing market share to brands that are more easily accessible. 

It’s also important that your username is available across all social media platforms. 

If you update your Facebook username, make sure to update it on Twitter and Instagram as well.

In this blog, we’ll explain how to:

  • change your username on YouTube
  • change your username on Instagram
  • change your username on Twitter
  • change your username on Facebook
  • change your username on TikTok
  • change your username on Snapchat

As well, we’ll explore reasons why you should change your username and what to look out for when doing so.

What Should You Consider When Changing Your Username on Social Media?

If you’re looking to change your username on YouTube, Instagram, Facebook, and so on, you want to make sure that you’re choosing a username that is clear, simple, and easy to remember. 

It should be something different from your old account name, but not too dissimilar. A username that is too much like your previous name could get confusing for users who are following both accounts. 

You should ensure that your new username reflects positively on your brand and is a good representation of who you are, especially if it’s going to be publicly displayed across various social media platforms. This means choosing something which will look great in the “username” section of all your profiles! 

You also don’t want the change in moniker to be temporary (especially when some social media platforms cap how often you can change your username)—so avoid any names referencing holidays, seasons, or special occasions.

Here are a few more points to consider when changing your username on social media.

Make Sure Your Customers/Followers Can Still Find You

If you’re going to change your username on social media, you need to make sure that your current customers/followers can still find you.

This means that if they’re subscribed to your channel on YouTube or following you on Facebook, for example, then make sure these details remain the same after changing your username. You might need to update old links and bios with information regarding your new name.

You should also make sure that your new username is easy to remember and spell, since this will help you in the long run. 

If users can’t find or easily access your content when they search for it on their preferred social media platform, then there is little point in changing names!

Consider Making an Announcement of the Name Change

Once you change your name on YouTube, Instagram, Twitter, etc., you should consider announcing the change to your followers

This is important because some social media users might not be quick to update their information with regard to your new name or username, meaning that they won’t know who you are when browsing through posts—and you’ll have to recreate brand loyalty (or risk losing a follower).

Make Sure No Other Businesses Have the Same Name

It’s important to check that your new username isn’t already being used by other companies or individuals. If the name is taken, you’ll need to change it again so as not to confuse potential customers and clients.

You can use online tools, such as Namechk or BrandSnag, to quickly cross-check your chosen username across social channels.

Be Consistent With Your Other Social Media Account Names

You might also want to consider updating all of your profiles across different sites so that each has the same username. 

This way, people who follow you on various platforms can easily navigate your social media profiles and find the information they are looking for quickly.

You’ll notice that my branding is consistent across every social media platform I use, and I always use the same username. You should do the same. 

How to Change Username on Social Media - Neil Patel change YouTube username

How to Change Your YouTube Username 

To change your YouTube username you will need to follow these steps:

  1. Sign in to your YouTube account.
  2. Go to Settings by clicking on your account avatar in the top right corner.
  3. Click on Overview and select Edit on Google next to your current username.
  4. Change your YouTube username and click OK.

You can also change your YouTube username in the YouTube Studio. Just go to Customization, Basic Info, and change the channel name to anything you like.

After you change your YouTube username, be sure to let your subscribers know.

If they don’t recognize your new name in their feed, they may unsubscribe from your channel immediately.

Making a video explaining your name change or even a video showing your new channel design is a great way to help people understand the change.

When you change your YouTube username, be sure to choose a username that adheres to YouTube’s Community Guidelines or you’ll risk getting reported and removed.

How to Change Your Facebook Username 

To change your Facebook username on a Facebook page you will need to follow these steps:

  1. Navigate to your Facebook page.
  2. Click About on the left side of your page.
  3. Go to General, Username, and click Create Page @username or Edit.
  4. Type in your new username and click Create Username.

To change your Facebook username on your Facebook profile follow these steps:

  1. Navigate to your Facebook profile.
  2. Click Settings in the top right corner.
  3. Click Username.
  4. Type in your new username and click Save Changes.

Keep in mind that you can only change your Facebook username once every 60 days.

If the username you are hoping to use is unavailable it will be highlighted in red.

How to Change Your Twitter Username 

To change your Twitter username follow these steps:

  1. Click on the More button (shown as three dots ○○○) on your navigation bar.
  2. Click on Settings and privacy.
  3. Click on Your account.
  4. Click on Account information.
  5. Enter your Twitter password.
  6. Type in your new username.
  7. Click Save.
How to Change Username on Social Media - How to Change Your Twitter Username

Your Twitter username must be more than four characters long and up to 15 characters.

It can only contain letters, numbers, and underscores.

Your display name, which is shown publicly on your profile, can be up to 50 characters long.

Changing your Twitter username doesn’t affect the name on your profile or existing retweets.

Note that if the username you want to use is already taken you’ll need to choose another.

If you change your Twitter username, your old username will become immediately available for anyone else to use. 

If you’re having problems with username registration you can check out this article from Twitter.

How to Change Your Instagram Username 

To change your Instagram username, follow these steps:

  1. Go to your Instagram profile.
  2. Click Edit Profile.
  3. Type in your new username in the Username field.
  4. Click Done in the top right-hand corner.

If you have a large following on Instagram, the app may want to review your username change before it is approved.

If this happens, Instagram will notify you by email when your username change has been approved.

When changing your Instagram username, remember to use an email you have access to so that the app can send you notifications. 

If you don’t require approval, your new Instagram username will be immediately public on your profile. 

how to change your instagram name example

How to Change Your TikTok Username

To change your TikTok username, follow these steps:

  1. Click Profile in the bottom right of your TikTok app.
  2. Click Edit profile.
  3. Type in your new TikTok username.

Keep in mind that you can only change your TikTok username once every 30 days.

Your TikTok username can only contain letters, numbers, periods, and underscores. 

No periods can be used at the end of your TikTok username.

How to Change Your Snapchat Username 

Unfortunately, it is not possible to change your Snapchat username.

It is also not possible to transfer any account data, including Memories or Snapstreaks, to a new username or account.

You can, however, change your Snapchat display name.

Your Snapchat display name is how you appear on Snapchat.

To change your Snapchat display name follow these steps:

  1. Click the ⚙️ symbol in My Profile to open Settings.
  2. Click Name under the My Account section.
  3. Type in your new Snapchat display name.
  4. Click Save.

Please note, that while new Snapchat friends will be able to see your updated display name, your current friends and followers will only see your original display name.

Your display name may also change in individual apps if the user has your phone number saved in their phone under a different name.  

If you are running any current Snapchat campaigns or promotions, it is important to note that any existing links, coupons, or promo codes will continue using your original Snapchat display name.

How to Change Your LinkedIn Username 

On LinkedIn, you can change how your name is displayed on your profile.

You can either display your full name or your first name and the first letter of your last name if you’re looking for more privacy.

how to change your linedin user name screenshot of where to click

To change your LinkedIn username on a public profile, follow these steps:

  1. Click the Me icon at the top of your LinkedIn homepage.
  2. Click View Profile.
  3. Click Edit near the top right of your picture.
  4. When the Edit intro pop-up comes up, update your First Name and Last Name in the text boxes.
  5. Click Save.

To change your LinkedIn username on a private profile, follow these steps:

  1. Click the Me icon at the top of your LinkedIn homepage.
  2. Click Settings & Privacy from the dropdown menu.
  3. Click Visibility on the left.
  4. Go to Visibility of your profile & network.
  5. Click Change next to Who can see your last name.
  6. Select the way you want your last name displayed on LinkedIn.
  7. All changes are saved automatically.

Frequently Asked Questions About Changing Your Username On Social Media

Is it bad to change your Instagram username?

No. It isn’t bad to change your username on social media sites if you feel like it will better represent yourself or the type of content that you are posting. There is no right or wrong way to go about this, but there are a few things that should be considered before changing names.

Will I lose followers if I change my username?

You shouldn’t lose followers when you change your username on social media. That said, it’s important to let your followers know that you have changed your name so that they don’t unfollow you.

What happens if I change my name on YouTube but forget to update it everywhere else?

If you have changed the name in one place and not updated it all other places, some people might find that confusing or irritating. 

When should I change usernames for social media sites?

You can change your name on social media sites whenever you want. There are no laws or rules that govern this process, but it’s important to consider how other people will feel about the name change before moving forward with anything.

Change Your Social Media Username: Conclusion

If you’re looking to change your username on Twitter, Facebook, YouTube, or any other social media sites, you can do so by following a few simple steps.

When changing your username, it’s a good idea to consider how it will affect your followers and if the new username sounds professional. 

It’s also a good idea to consider why you want to change usernames on social media, as this can help prevent future problems with your online presence.

Make sure you don’t change your username too many times, as that can end up confusing your audience and possibly resulting in lost followers.

Before you start the process of changing your username on social media, create a strategy, discuss with your peers, and ensure you have a plan in place to update any content that is attached to your old username.

What was your audience’s reaction when you changed your social media username?


from Blog – Neil Patel https://ift.tt/2Zh3uqx
via IFTTT
How to Use Google’s Advanced Search Operators

How to Use Google's Advanced Search Operators

Regardless of which industry you operate in, providing value and gaining visibility has never been more important.

With increased competition in the digital space for audiences, you need to employ every tool in your toolbox to outmaneuver your competitors.

If your website isn’t ranking high on Google’s search engine results page (SERP), you may need to look for different ways to reach your intended audience. 

When you’ve exhausted all options, it’s time to look to non-conventional tools for search engine optimization (SEO). While there are plenty of choices available, both paid and unpaid, have you considered using Google’s own search functions to top the SERPs?

If you answered no, read on to learn how Google’s advanced search operators can considerably benefit your strategic digital efforts. 

What Are Google’s Advanced Search Operators?

While you may be familiar with some basic search operators from Google, the search algorithm supports deeper dives through a series of commands.

These commands include things like search term (denoted by: “[term]l”), prices (denoted by: $[item]), and site-specific sources (denoted by: site:[site.com]).

Search operators like these are super handy for the everyday Googler, but more advanced operators can be a differentiating tool for the savvy marketer looking to gain a competitive advantage.

From word searches within titles to results that are within one word of another, Google’s advanced search operators can impact SEO and improve your standing in a market.

In this post, we highlight the top advanced search operators and how they can help take your digital strategy to the next level.

Why Should You Use Google’s Advanced Search Operators?


On the surface, the benefits of advanced search operators may seem to primarily align with search functionality; these handy codes can actually offer much larger benefits.

Below, we break down the top four ways advanced search operators can aid your digital presence.

1. Improve SEO Ranking

Let’s be honest: we’re all trying to improve our SEO ranking.

You can use the codes associated with many of Google’s advanced search operators to identify on-site issues that are negatively impacting your SEO.

These include:

  • loading times
  • host stability
  • security
  • bounce rates
  • search relevance
  • on-page keywords

From identification of indexing issues to highlighting linking opportunities, advanced search operators can go a long way in helping you improve SEO for improved SERP appearance. 

Plus, there’s another added benefit: this is a free strategy you can undertake individually to enhance your site’s overall performance.

2. Increase Blog Post Traffic

Struggling to attract the right traffic to your blog?

Posting as a guest on different industry-related blogs and news sites is an excellent strategy for driving more organic traffic to your website, not to mention scoring backlinks (which you can review using Ubersuggest).

Luckily, there’s an advanced search operator that can help you identify guest blog opportunities.

Use intitle:[topic].

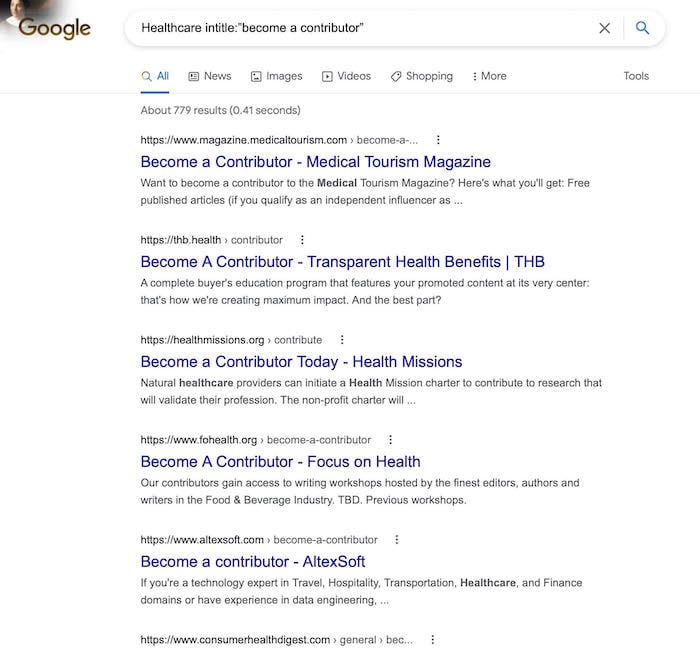
For example, if you’re searching for a guest blog spot on how to manage an electronic health record implementation (EHR), you would search the following:

Healthcare intitle:”become a contributor”

Healthcare intitle:”become a contributor” on advanced search operator

3. Learn Your Competitors’ Publishing Schedule

As every marketer knows, keeping an eye on your competitors’ business is vital to your continued success.

To help make your monitoring easier, use the advanced search operator site:[competitor site] to learn how often your competitors post to their blog.

Armed with this knowledge, you can tailor your posting schedule to be competitive and assess what they’re sharing, when, and why.

This research can also give you a better view of industry topics that generate organizational interest—an especially effective content strategy for B2B businesses

4. Identify Q&A Thread Opportunities

We all want more exposure and to establish ourselves as industry experts. We also want to identify any opportunities that can drive more traffic to our blog.


By answering questions or joining in on conversations on Q&A platforms, you can increase brand awareness and also demonstrate your knowledge to build trust with your audience. 

What’s more, you can subtly share links to your blog posts for further clarification, driving traffic to your blog.

To find relevant Q&A threads on known boards (such as Reddit, Quora, or other boards you interact with), search:

site:[board] intitle:[“topic”]

For example, if we’re hoping to contribute to a backlinking thread on Quora, we would search:

site:quora.com intitle:”backlink.”

Healthcare intitle:”become a contributor” in advanced search operator

5 Ways to Use Google’s Top Advanced Search Operators

While we talked in general categories above, let’s dive deeper into specific search operators that can help boost your SEO score

Trust us, you’re going to want to commit these to memory.

1. Find Indexing Errors

Most sites contain Google indexation errors—and this is potentially true of your site, too.

To ensure that Google is indexing your site, you can use the site:[your site] operator to view your number of pages indexed.

Armed with this information, compare this number to Google’s and take action to correct any errors.

2. Find Duplicate Content

Duplicate content doesn’t do your Google ranking any favors.

In fact, it can tank it.

Imagine this scenario: you’re working to optimize an e-commerce site and learn that there are multiple identical product listings with only the color changed.

That’s no good.

Rather than manually combing through description after description, use Google’s advanced search operator to identify these duplications.

Use site:“copied and pasted content” to correct these simple errors.

3. Find Content Ideas

While we’ve already shared how Google’s advanced search operators can help you find guest spots on other blogs and track your competitors’ publication schedule, it’s time to talk about how an operator can help you find content ideas.

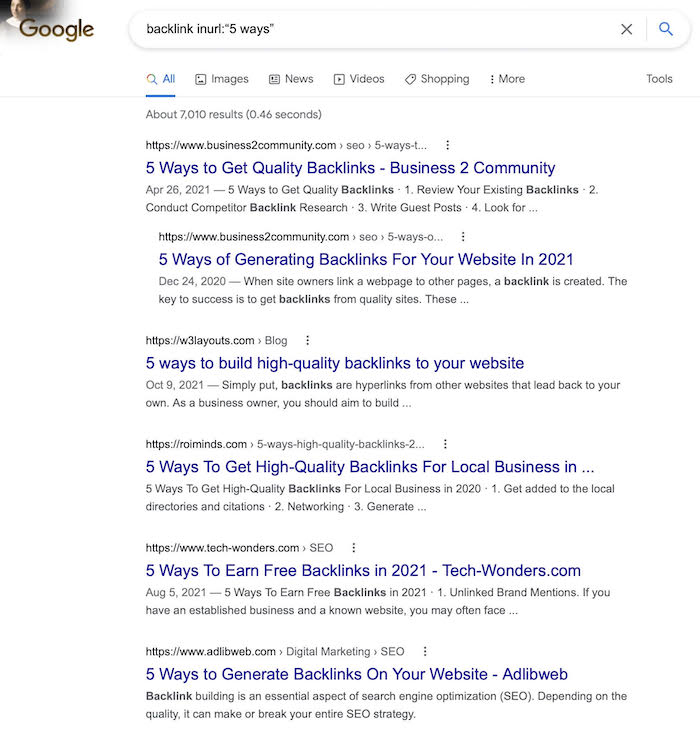
We all know how challenging it can be to come up with content topics regularly. To help make this arduous process easier, use the advanced search operator [inurl]:.

If we stay with our backlink example, we can search backlink inurl:“5 ways.”

By using this search function, you’ll return results within your industry, allowing you to browse for relevant content ideas.

site:quora.com intitle:”backlink.” in advanced search operator

Pretty cool, right?

4. Find Linking Opportunities

Linking should top your SEO strategy list. You should constantly assess opportunities for both internal and external linking. Luckily for you, Google’s advanced search operators can help you do both.

External Linking Opportunities

Linking can have a huge impact on your SEO ranking. To help you find opportunities, you can use Google’s advanced search operator.

First, identify a site you would love a link from. After that, use search operators to create a list of similar sites you may also want to gain a backlink from.

In this case, the search operator you’ll want to use is [related:].

For example, imagine you’re a marketing firm and you would love a link from Moz. You would search related:moz.com to generate a list of similar sites. 

Internal Linking Opportunities


Internal links are vital to your site’s success, not to mention your SEO strategy.

When used appropriately, internal links encourage visitors to spend more time on your site and provide navigational efficacy throughout. 

Let’s imagine you just published a how-to blog.

It would be wise to go through your site to see where linking to this blog would be beneficial.

To find anchor text that aligns with your blog, you can search site:[yoursite] -site:[blog url] intext:”[anchor text].”

From there, you can start optimizing backlink opportunities for your newest content asset.

5. Discover Non-Secure Pages

Data breaches have been headline news in what feels like a weekly occurrence. Given these stories, it feels like no industry is safe from the threat of a breach. 

With that said, if your site uses credit card payments, you need to guarantee all of your pages are secure with an HTTP.

If you’re unfamiliar, an HTTP is an application layer protocol that is used for increased security of sensitive information.

Every e-commerce site must ensure that all of its pages are secured with this particular security layer.

Luckily, there’s an advanced search operator that can be used to easily identify insecure pages within your eCommerce site.

Simple enter: site[yourdomain.com] -inurl:https

By using this formula, you can identify all of your site’s pages that aren’t secured with an HTTP.

Frequently Asked Questions About Google’s Advanced Search Operators 

What are advanced search operators?

Google’s advanced search operators are small pieces of code that can be used to search the development side of sites. By harnessing these operators, users can identify areas for site improvement, opportunities for growing blog traffic, among many other benefits. 

Are advanced search operators difficult to use?

While the term advanced may suggest a level of complication, these operators are incredibly easy to operate. All you need to know is what you’re searching for, and the operator will do the rest. 

How do Google search operators work? 

Google search operators work by enabling users to focus search solely on specific keywords, thus excluding others. By honing in on the particulars, your search becomes that much more targeted and effective. 

What is the difference between basic Google search and advanced?

Basic Google search and advanced Google search differ primarily in user intent. If you’re browsing the web, you’re going to want to use a basic search function. However, if you’re seeking very targeted information, you’ll want to turn to advanced search functionality to help refine your specific search. 

Google Advanced Search Operators Conclusion

We know how hard it can be to keep up with the revolving-door nature of SEO. As savvy marketers, we must use every tool available to us to ensure that our sites are as aligned with Google’s algorithm as possible. 

In this vein, using search operators provided by Google is an easy, free way to ensure that your SEO goals are aligned with the search engine’s algorithm.

As you enact the above five top search operators in your optimization strategy, you will undoubtedly uncover other ways these operators can help you improve your site from a variety of perspectives, ranging from content to site speed monitoring.

What’s the most useful search operator you’ve used? 


from Blog – Neil Patel https://ift.tt/30Xc12A
via IFTTT

Monday, 22 November 2021

The Riches Are Not in The Niches

In marketing, everyone says you need to pick a niche.

And mainly because people believe the following things…

  1. It is easier to market when you pick a niche (fewer competitors)
  2. Easier to make money (fewer competitors)
  3. You can get traction faster from a monetary standpoint (fewer competitors)

In other words, you make money faster because there are fewer competitors, but that isn’t really true.

Unless you are looking to create a “lifestyle” business, the riches are not in the niches.

And I wouldn’t recommend going after a niche.

VCs don’t fund “niches”

By no means am I trying to say you should raise venture capital or even need to.

But ask yourself this… what major venture, or venture fund at all, funds niches?

Sequoia, Andreessen, Accel, Tiger, Softbank, and all major funds don’t fund niches.

Companies that raised money a long time ago from VCs such as Google, Facebook, Airbnb, Apple… and the list goes on and on… are all examples of companies that go after big markets.

And that’s what VCs want… the elusive “unicorn”. A company that hit over a billion-dollar valuation, which doesn’t happen when you go after a small market (aka. a niche)

Even the funds that specialize… let’s say fintech venture funds, aren’t going after niches. Fintech is a massive category and isn’t really a niche.

In other words, they don’t go after “niches”. Why?

Well, let me tell you a quick story that will explain why…

Years ago, I was speaking at a conference in Seattle. It was more so a panel.

It was me and Rich Barton.

If you don’t know who Rich Barton is, just think of Expedia, Glassdoor, and Zillow. He is the founder of all 3 of them.

Someone from the audience asked him… “what type of companies do you invest in”.

His response was simple… “big markets”.

He didn’t mention niches. He said entrepreneurs should go after big markets because it is roughly the same amount of work to create a business in a small niche as it is in a big market. So why limit your upside?

And then to make the message even more clear, he gave us all a baseball analogy. When you go up to the plate and swing it takes the same amount of effort to swing a single, double, triple, or home run. So might as well swing for a home run each and every time.

It takes the same amount of work…

If you are going to create a business, it takes the same amount of work to create a business in a small niche as it would to go after a big total addressable market.

And believe it or not, it’s actually easier to generate more revenue when you are in a big market, versus going after a niche.

A great example of this is my latest company, NP Digital. It was the 21st fastest-growing company in the United States according to Inc Magazine.

My other businesses were not on the fastest-growing companies list in the past.

You could say some of it is luck or the right timing. But that isn’t the main reason it is on the list.

You could say great execution, but I worked just as hard on my previous businesses.

And you could say I have more experience now and I do… but I also had a lot of experience when I started the business before this one.

The big difference on why this business is growing so fast is because it is in a big market… advertising.

That’s it! Seriously, that is the big difference between this business and others. My previous businesses were in “niches” or smaller markets.

This one is in a bigger market. Which makes it easier to generate revenue.

For every excuse, there is a counterpoint

I was at a conference the other day and a few people talked to me about going after a “niche” which encouraged me to write this blog post.

They used the same logic that I mentioned at the beginning of this post in which:

“It’s easier if you create a business in a niche”.

Well, let me break down a few things for you…

  1. Marketing in a niche isn’t easier – sure you can get your SEO rankings faster, but the keyword volume isn’t that high. So, getting to the top won’t add revenue fast enough. Plus, you won’t have as much traffic to run conversion optimization experiments which makes it more difficult to optimize your site.
  2. It’s not easier to grow your revenue – I’ve found that it is harder to make money in a niche. There are less people to sell to, which makes it harder to scale up and grow.
  3. It’s harder to become efficient in a niche – from a financial margin perspective, when you have low revenue in many cases it is hard to have high profit margins. But as you scale you can make things more efficient and have a better profit margin.

Conclusion

If you want to go after a niche, you can and there isn’t anything that is wrong with it. But your upside will be limited.

Sure, you can have a great lifestyle business and if that makes you happy, by all means, go and do it.

If you want more, then you are going to have to create a business in a larger market.

So, this brings me to the real question, is your business or the company you work for in a “niche”? If so what’s your game plan?


from Blog – Neil Patel https://ift.tt/3nHiIP2
via IFTTT
How To Build a WordPress Website

WordPress.org homepage for How To Build a WordPress Website

Disclosure: This content is reader-supported, which means if you click on some of our links that we may earn a commission.

WordPress has officially passed the 40% mark and powers over one-third of the entire web. 

It’s like the Oprah Winfrey of the web hosting world—reliable with an excellent reputation and loyal user base. I use the platform for my business, and I think it makes perfect sense for just about anyone to build a website on WordPress.

Creating a website may seem scary if you have never done it before, but trust me when I tell you that times have changed. It’s now faster, cheaper, and easier than ever.

In this guide, I’ll tell you how to build a WordPress site in under 60 minutes.

Your Two-Minute Cheat Sheet

Don’t have enough time to go through the whole article? Here’s your quick cheat sheet.

This is just the barebones guide. You can find complete detail on every step below.

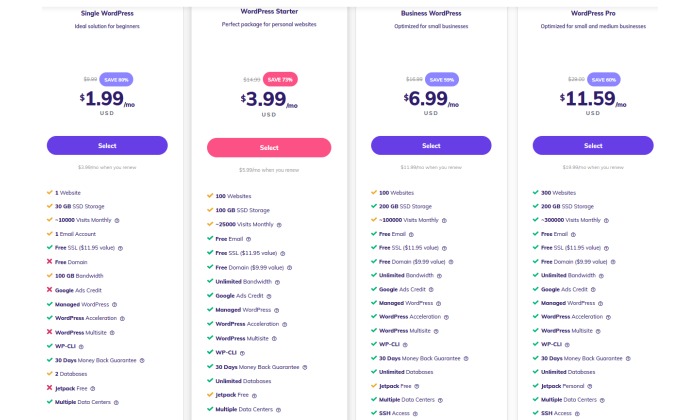
While you have several web hosting provider options available, I recommend starting your WordPress website journey with Hostinger. It’s super dependable, offers fast loading times, and is good for your budget.

Hostinger pricing for How To Build a WordPress Website

Just click here to head over to Hostinger, select the WordPress Starter package, and then Hostinger’s setup wizard will take care of much of the rest.

Towards the end of the guided setup process, you’ll be able to secure your free domain name (included with your Hostinger WordPress Starter plan). Just make sure to opt for WHOIS privacy when you’re given the option after selecting your domain.

Normally you’d have to install WordPress next, but Hostinger has already done that for you. Familiarize yourself with how everything is set up and pick a theme for your website that suits your brand.

My favorite is place for new and striking themes is ThemeForest, but you can also stick to WordPress’s official directory. 

Make sure you set your permalink structure to make your links more readable and optimized for the SERPs. This is super important, so please don’t skip it. You can also install plugins to extend your website’s abilities, but it’s strictly optional.

Finally, all that’s left to do is create fantastic content that makes visitors flock to your website.

Voila! You now have a WordPress website that looks beautiful, has amazing content, and is ready to handle the traffic.

Let’s now see how the whole thing works in more detail. Feel free to jump ahead if you’ve already gotten some of the early steps done!

  1. Choose a Domain Name
  2. Select a Web Hosting Provider and Register a Domain Name for Free
  3. Use a Theme or Design for Your Website
  4. Install Plugins (Optional)
  5. Configure Important Site Settings
  6. Set up Important Webpages and Promote Your Site

Step 1: Choose a Domain Name

Your domain name is your identity on the internet. It’s how your audience will find you and identify your brand. Precisely why you should choose something that reflects your brand and is easier for people to type into their browser and find you.

You have complete freedom to choose your domain name, though. You can choose any name you want—provided it is available and not registered by other companies. 

Here are a few tips for selecting a great domain name for your website:

  • Make it brandable and unique-sounding
  • Make sure it’s memorable
  • Keep it short 
  • Keep it easy to spell, pronounce, and type 
  • Include niche-related words. For instance, if you plan on selling pizza, it would make sense to add pizza somewhere in the domain.

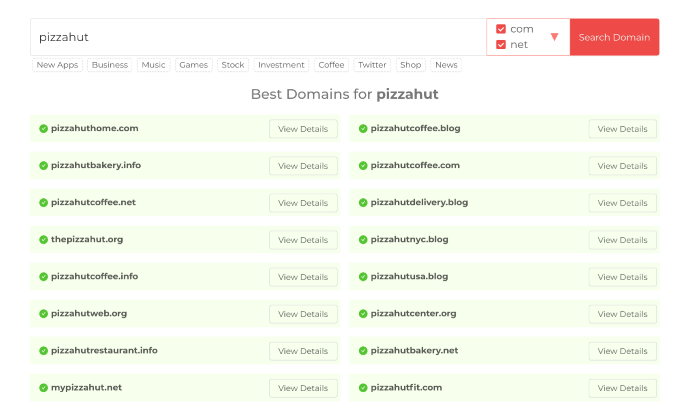
Think about it: Doesn’t www.pizzahut.com sound better than pizzasellingplace.com? Exactly.

You can use Domain Wheel, a free website name generator, to develop more ideas if you’re looking for some inspiration. Simply put in a keyword related to your niche, and the tool will give you tons of suggestions to inspire you.

Domain Wheel search for How To Build a WordPress Website

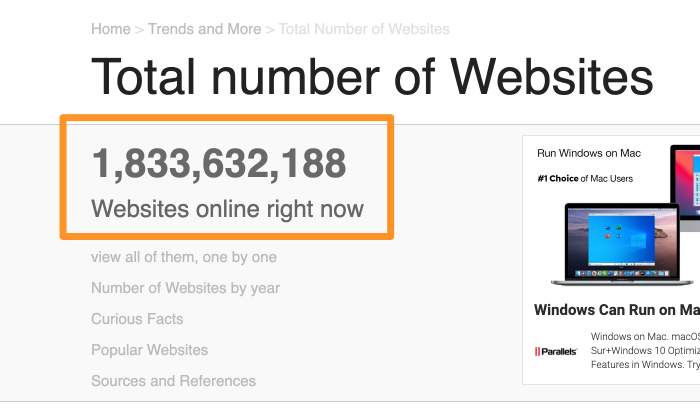
Now that you have a prospective domain name, you have to check for its availability. Considering there are about 1.8 billion websites online, staying original can be a little challenging, but it’s definitely worth the effort.

Total online websites for How To Build a WordPress Website

Since we all love free things, you can register your domain free of cost when subscribing to a web hosting service.

Speaking of domain registration…

Step 2: Select a Web Hosting Provider and Register a Domain Name for Free

There are hundreds of companies that sell web hosting services and tons of companies that allow you to register a new domain name. But wouldn’t it be more convenient to choose a company that offers you both services?

Case in point: Hostinger.

This web hosting provider is reliable, beginner-friendly, cheap, AND gives you a domain name for free—take it from someone who has created many websites for his clients in his career. 

Just head to the Hostinger website using this link, click Start Now, and then click Select under the WordPress Starter plan. That’s the most affordable hosting package that includes a free domain.

Hostinger pricing for How To Build a WordPress Website

On the checkout screen that follows, make sure you select the four-year term to get the best monthly rate for this plan.

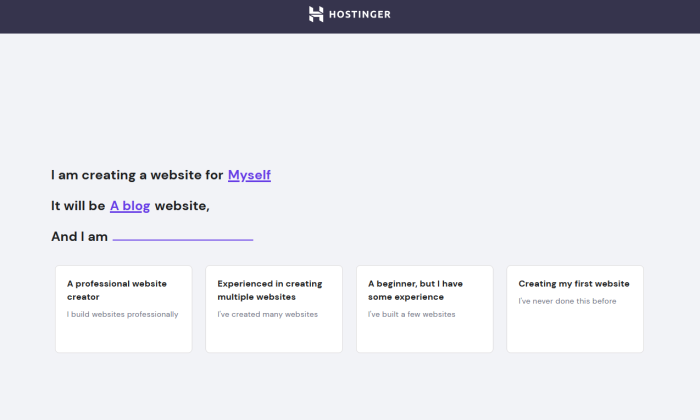
After you create your Hostinger account and submit your payment information, Hostinger’s guided setup wizard takes over.

It will ask you a few quick questions about the purpose of your website and your comfort level with building one.

Hostinger guided setup step 3 for How To Build a WordPress Website

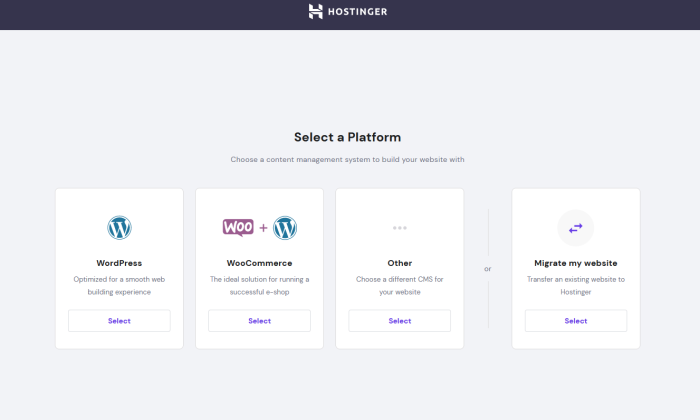
After that, select WordPress as your platform of choice. Hostinger will take care of installing it for you.

Hostinger setup WordPress install How To Build a WordPress Website

Hostinger will even let you pick a theme at this point, but you can just skip that step since we’ll find a good theme later on in this guide.

You’re almost done now! The last step is securing your free domain.

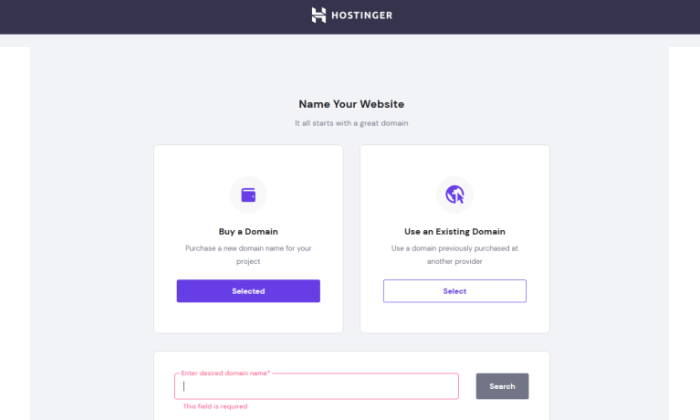
The next screen will give you the choice to get a new domain or use an existing one that you already own. Click the option on the left and a little box will appear that allows you to search for you domain name.

Hostinger secure domain for How To Build a WordPress Website

Since we did all the legwork in Step 1 of finding an available domain, just enter it into the box and select it when it appears.

There’s one important thing to keep in mind here. I highly recommend opting for WHOIS Privacy for $10/year. It conceals personal information like name, email, and phone number from appearing in public databases. After all, spending a few extra cents is nothing when it comes to security.

The option to add it on will be right below your selected domain. Just finish checkout there and you’re all done!

Hostinger will take a few minutes to finish the WordPress installation and set up your site.

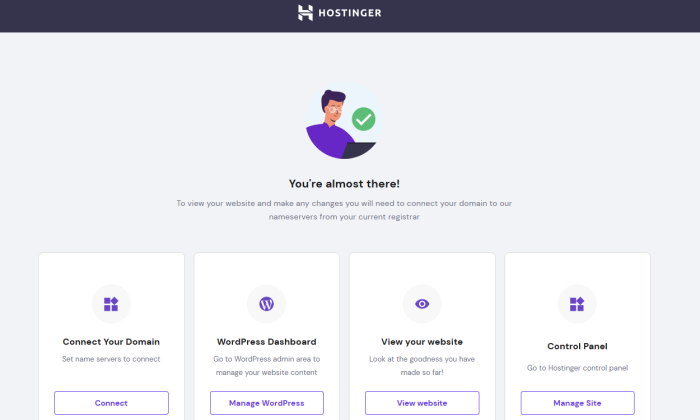
Once that’s done, Hostinger will take you to your dashboard. You’ll be greeted by this screen the first time you visit it after initial setup:

Hostinger setup complete for How To Build a WordPress Website

Click Manage WordPress and you’ll be whisked away to the WordPress dashboard.

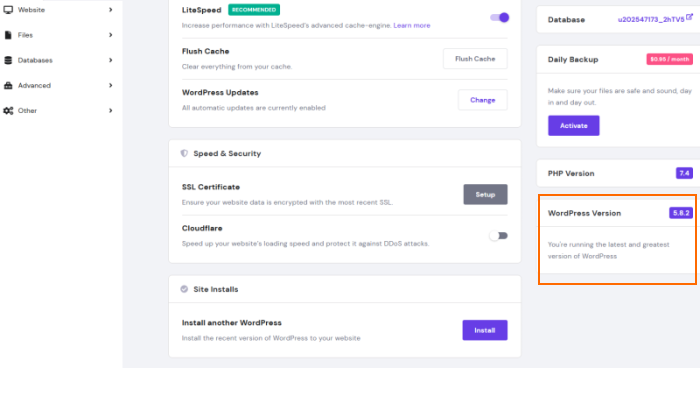
There, you can see what WordPress version has been installed.

Hostinger WordPress dashboard for How To Build a WordPress Website

You can even do a fresh installation of WordPress in the same area.

So, you’ve got your hosting and domain secured and a WordPress site ready to go! Now it’s time to make it your own.

Step 3: Use a Theme or Design for Your Website

One of the biggest USPs of WordPress is it supports themes. 

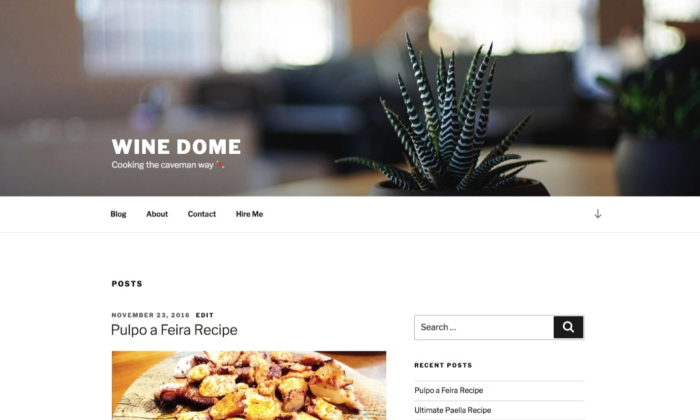
Themes are interchangeable designs that allow you to change how your WordPress website looks at the touch of a button. For example, this is what your website will look like by default:

Wine Dome theme example page for How To Build a WordPress Website

You can change your website’s appearance by choosing another popular free theme (I chose Hestia). It’ll now look like this:

Hestia example page for How To Build a WordPress Website

See why theme compatibility is WordPress’s biggest USP?

Choose a Theme You Like

There are hundreds—if not thousands—of WordPress themes out there. 

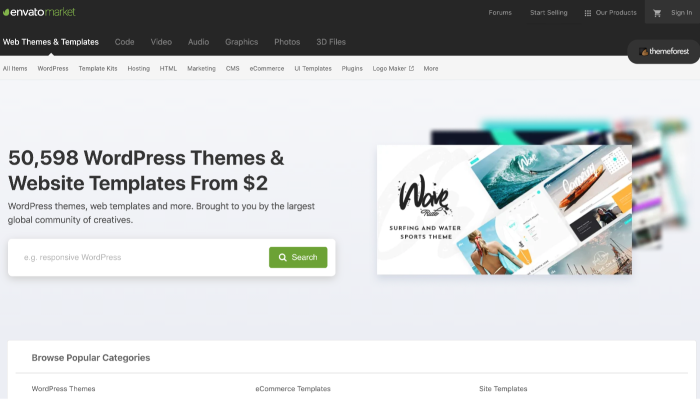
You can start by looking at the official directory at WordPress.org. But other than that, there are several other theme stores and marketplaces, such as ThemeForest. These are third-party sites that offer free and premium themes to alter the website’s presentation without changing the contents.

Envato Market/Theme Forest homepage for How To Build a WordPress Website

You can go through all the different sites and select a theme that you like best.

Install Your Chosen Theme

If you select a theme from the official directory at WordPress.org, all you have to do is hit Install right away. Here’s how to go about it:

Go to Appearance, followed by Themes, and then click on Add New. Enter the name of the theme you want to install in the search bar, and then click on the Install button under your desired theme.

After the installation, click on Activate to enable the thing on your website.

If you want to use a theme bought from a trusted third-party, the steps will differ slightly. 

Here’s how you can install a premium theme on your site:

  1. Start by downloading the .zip file of the new theme. 
  2. Log in to your WordPress dashboard, and go to Appearance, and then Themes.
  3. Click on the Add New option. You’ll then be directed to the WordPress theme dashboard. 
  4. Select the blue button at the top of the screen that says Upload Theme. Choose the .zip file from your computer after the prompt.

You’ll see a link to activate your team after a success message. That’s it!

While some themes are free, premium themes vary in price. There are options starting at $10 and ones going all the way up to $200. You can choose an option that fits your budget and preferences best.

Step 4: Install Plugins (Optional)

You can consider installing plugins to boost the functionality of your website. Think of them as applications for your mobile phone.

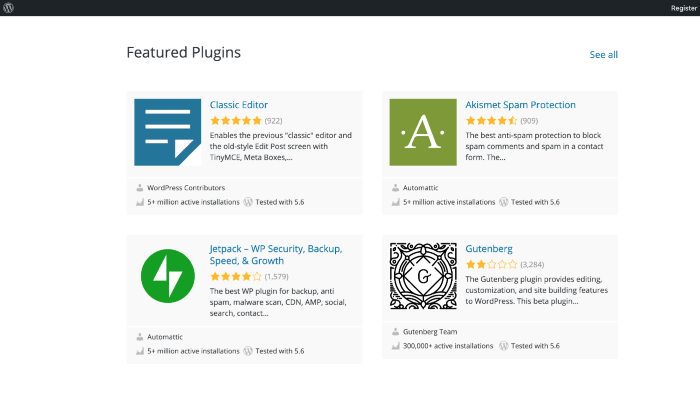
You can refer to our best WordPress plugins guide to zero down options, but you have free reign to choose the ones that appeal to you most. From optimization to website traffic analysis to security, you’ll find tons of options for every category.

WordPress plugins page for How To Build a WordPress Website

That said, don’t go overboard when installing plugins. It ends up slowing down your website, which, in turn, might result in traffic loss. 

As they say, there is too much of a good thing.

Step 5: Configure Important Site Settings

Setting up permalinks is very, very important! Precisely why you should do this immediately after starting your WordPress website.

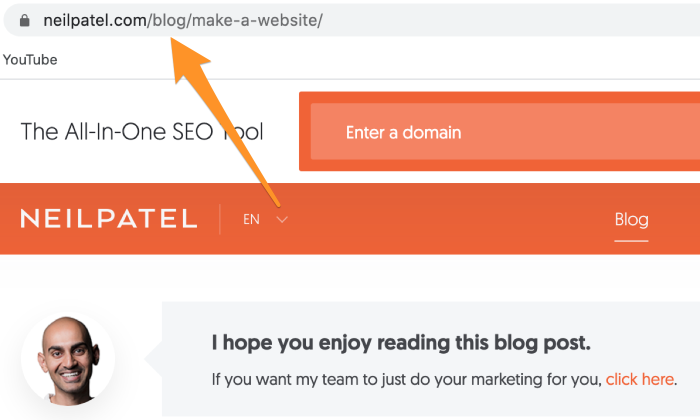
Permalink structure decides how your website links look. Think of it as a representation of your site structure. For NeilPatel.com, it looks something like this:

NeilPatel.com permalink example for How To Build a WordPress Website

A good permalink structure tells your visitor exactly where they are on your website (in our example, they are in our blog section), while a bad structure does the opposite. Getting the permalink structure right is also crucial for boosting your SEO ranking.

There are many ways to do it wrong, which is why I’ve compiled a three-step guide to help you get it right:

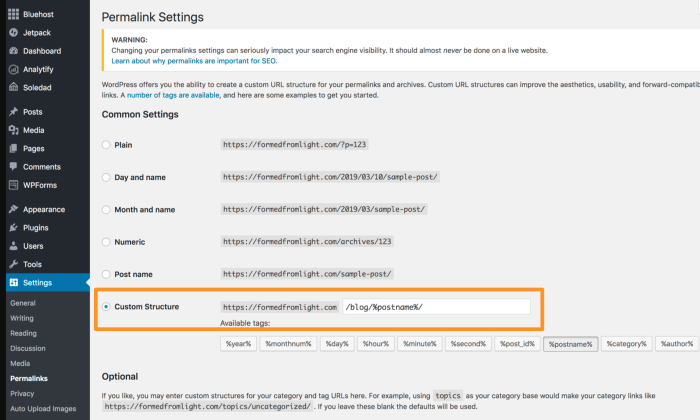
  1. In your WordPress dashboard, click on Settings from the side menu and go to Permalinks.
  2. Under the Common Settings field, click on Custom Structure
  3. It makes zero sense to go for Numeric as it’ll only confuse your visitor. Plus, it doesn’t serve much for SEO purposes.
  4. Enter the tag string “/blog/%postname%/
WordPress permalink settings for How To Build a WordPress Website

Once you’re done, click on Save to save the changes.

Step 6: Set up Important Webpages and Promote Your Site

With your website ready, you can now focus on creating high-quality content that helps you boost your traffic and conversions. Start by creating essential webpages like About, Contact Form, Privacy Policy, Portfolio, and Store (if applicable).

Want more information and a step-by-step walkthrough? Head over to my guides on how to start a blog and how to make money from blogging.

I really cannot emphasize enough the importance of having optimized content on your website that is relevant to your niche. So make sure you do thorough research to get all the nitty-gritty right.

Conclusion 

That was all you needed to build a WordPress website. 

At the end of it all, you’ll have a domain name, a great web hosting provider in Hostinger, and an up and running website. Keep experimenting in your niche, and you’ll soon establish a loyal fan base that values your opinion or love your products/service.

Have you launched your website yet? Who is your all-time favorite web hosting provider, if yes?


from Blog – Neil Patel https://ift.tt/3dOZiDt
via IFTTT